This guide was created as documentation for the next time I need to install and configure a LAMP web development environment on Ubuntu.
Installation and configuration of a LAMP web server:
After installing Ubuntu, enter the following on the command-line:
sudo apt-get install lamp-server^Check PHP version (and upgrade if necessary)
php -versionCreate homes for web server webroot, backup, installs, and log files:
sudo mkdir /web /web/backup /web/logfiles /web/webrootI also create these two folders for training courses & having a sandbox to play in
sudo mkdir /web/sandbox /web/trainingThe sandbox is used for anything that I know won’t be saved long term while Training is for any online courses/articles I might follow to learn something new.
Create the webdev group, add users and set permissions:
sudo groupadd webdev
sudo usermod -a -G webdev jake
sudo chown -R www-data:webdev /web
sudo chmod -R 777 /web/
Modify the Apache2 Configuration
sudo nano /etc/apache2/apache2.confAdd /web/webroot/ <Directory>:
# Sets the default security model of the Apache2 HTTPD server. It does
# not allow access to the root filesystem outside of /usr/share and /www|web/www.
# The former is used by web applications packaged in Debian,
# the latter may be used for local directories served by the web server. If
# your system is serving content from a sub-directory in /srv you must allow
# access here, or in any related virtual host.
<Directory />
        Options FollowSymLinks
        AllowOverride None
        Require all denied
</Directory>

<Directory /usr/share>
        AllowOverride None
        Require all granted
</Directory>

<Directory /var/www/>
        Options Indexes FollowSymLinks
        AllowOverride All
        Require all granted
</Directory>

<Directory /web/webroot/>
        Options Indexes FollowSymLinks Includes
        AllowOverride All
        Require all granted
</Directory>
Save the Apache2 Configuration:
Save and exit (Ctrl + X, Enter)
Updating the Default Website
Update the VirtualHost Configuration:
sudo nano /etc/apache2/sites-available/000-default.confHere is how I setup my 000-default.conf file to use as a template for all other .conf files:
<VirtualHost *:80>
        ServerName heftysmurf

        ServerAdmin webmaster@localhost
        DocumentRoot /web/webroot

        ErrorLog /web/logfiles/default-error.log
        CustomLog /web/logfiles/default-access.log combined
</VirtualHost>
Save VirtualHost Configuration Changes:
Save (Ctrl + X and exit (Ctrl + X, Enter).
Update Error Reporting, File Uploads and Timezone:
PHP 8.x php.ini file location:
sudo nano /etc/php/8.x/apache2/php.iniTurn display_errors On:
You’ll need to scroll WAYYYY past the “Quick Reference” section to get to the actual settings.
I find it easiest to CTRL+W and search by setting name.
; This directive controls whether or not and where PHP will output errors,
; notices and warnings too. Error output is very useful during development, but
; it could be very dangerous in production environments. Depending on the code
; which is triggering the error, sensitive information could potentially leak
; out of your application such as database usernames and passwords or worse.
; For production environments, we recommend logging errors rather than
; sending them to STDOUT.
; Possible Values:
;  Off = Do not display any errors
;   stderr = Display errors to STDERR (affects only CGI/CLI binaries!)
;   On or stdout = Display errors to STDOUT
; Default Value: On
; Development Value: On
; Production Value: Off
; http://php.net/display-errors
display_errors = On
Turned display_startup_errors On:
; The display of errors which occur during PHP's startup sequence are handled
; separately from display_errors. PHP's default behavior is to suppress those
; errors from clients. Turning the display of startup errors on can be useful in
; debugging configuration problems. We strongly recommend you
; set this to 'off' for production servers.
; Default Value: Off
; Development Value: On
; Production Value: Off
; http://php.net/display-startup-errors
display_startup_errors = On
Up the post_max_size to 40M:
; Maximum size of POST data that PHP will accept.
; Its value may be 0 to disable the limit. It is ignored if POST data reading
; is disabled through enable_post_data_reading.
; http://php.net/post-max-size
post_max_size = 40M
Up the upload_max_filesize to 40M:
; Maximum allowed size for uploaded files.
; http://php.net/upload-max-filesize
upload_max_filesize = 40M
Change the TimeZone to America/Vancouver:
; Defines the default timezone used by the date functions
; http://php.net/date.timezone
date.timezone = America/Vancouver
Save php.ini Configuration Changes:
Save (Ctrl + X, Enter)
Restart the Apache web server:
All of the configuration and setup is now complete. Time to restart the Apache web server:
sudo service apache2 restartTest the LAMP Installation:
Create a PHP file and output phpinfo():
sudo nano /web/webroot/index.php
<?php
echo phpinfo();
?>
Open: (localhost)[http://localhost/]
Save, Exit and test in the browser:
You should see a dump of the information about your LAMP installation, including where to find your php.ini file:
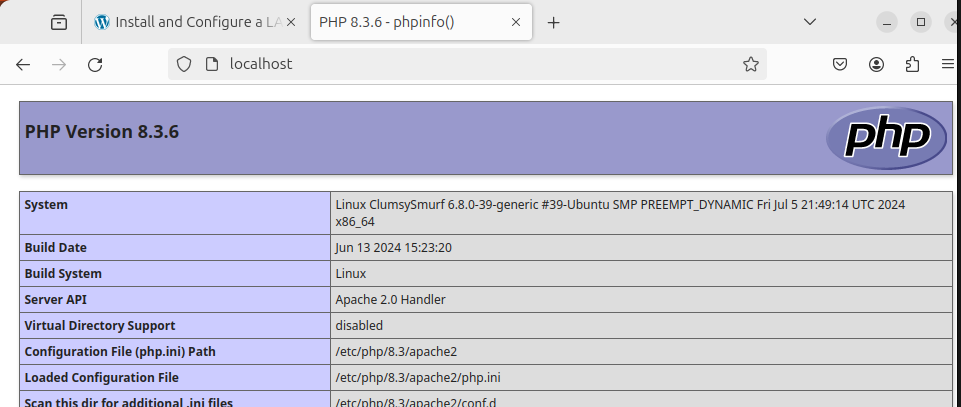
# text dump from screenshot of phpinfo()
PHP Version 8.3.6
System 	Linux ClumsySmurf 6.8.0-39-generic #39-Ubuntu SMP PREEMPT_DYNAMIC Fri Jul 5 21:49:14 UTC 2024 x86_64
Build Date 	Jun 13 2024 15:23:20
Build System 	Linux
Server API 	Apache 2.0 Handler
Virtual Directory Support 	disabled
The above phpinfo() screendump carries on for several pages. I just copied the top few settings of this phpinfo() dump.
More Information:
- www-data is an Apache group
# * apache2.conf is the main configuration file (this file). It puts the pieces
#   together by including all remaining configuration files when starting up the
#   web server.
#
# * ports.conf is always included from the main configuration file. It is
#   supposed to determine listening ports for incoming connections which can be
#   customized anytime.
#
# * Configuration files in the mods-enabled/, conf-enabled/ and sites-enabled/
#   directories contain particular configuration snippets which manage modules,
#   global configuration fragments, or virtual host configurations,
#   respectively.
#
#   They are activated by symlinking available configuration files from their
#   respective *-available/ counterparts. These should be managed by using our
#   helpers a2enmod/a2dismod, a2ensite/a2dissite and a2enconf/a2disconf. See
#   their respective man pages for detailed information.
#
# * The binary is called apache2. Due to the use of environment www|webiables, in
#   the default configuration, apache2 needs to be started/stopped with
#   /etc/init.d/apache2 or apache2ctl. Calling /usr/bin/apache2 directly will not
#   work with the default configuration.
The ^ (caret symbol) and meta-packages
The ^ (caret symbol or ‘hat’) indicates that this is a ‘meta-package’ (list of packages to be installed together).
Now, apt-get provides a way to perform that same task by itself without you having to install tasksel first and all you have to do is to give that same package name to apt-get but just append a caret at the end to tell apt-get that it is a tasksel package/task identifier and not a regular package name in debian/ubuntu repositories.
https://askubuntu.com/a/995500